Thursday, March 15, 2012

Cacti: http to https

Though may not be required for most users to use Secured HTTP for their Cacti System, some may be required as a basic policy requirements especially for financial institutions. The simple PHP code below will redirect all http request to https, this is also the simplest method that will do the job compared to other methods that you may find on the web.

<?php
if ($_SERVER['SERVER_PORT']!=443)
{
$url = "https://". $_SERVER['SERVER_NAME'] . ":443".$_SERVER['REQUEST_URI'];
header("Location: $url");
}
?>

The code came from this blog, and is made for IIS Web Server, but after giving it a try on Centos 5, my Cacti System, it works like a charm and is very easy to deploy.

So here is the tip on how to deploy in your Linux-Cacti Machine:

1.  Edit the index.php located on cacti's root folder

#cd /var/www/cacti
#vi index.php

    copy the PHP code above and insert it on the first line of index.php

2. Exit from vi saving the changes and restart httpd service

#service httpd restart

Open your cacti using http://your-server-ip/cacti, this will redirect you to https://your-server-ip/cacti and ask you to verify and confirm web certificate on the first use. Just proceed and complete the process and you are good to go.


The only one problem is, upon login on your cacti and pointing the browser directly to the webpage content like:  http://your-server-ip/cacti/plugins/devices/device.php, it will NOT redirect you to https://your-server-ip/cacti/plugins/devices/device.php, instead, the page will just open as a regular http.

A simple fix would be ......insert the PHP code on "device.php". Do this on your other pages as well.


Wednesday, March 14, 2012

Cacti: Ping is "up" but Device status is "down"

This a simple solution to a problem on ping availability detection in Cacti. Commonly, you notice that when you use the ICMP ping for downed detection, cacti can ping the host but still, it displays "down" under the Devices. You may have tried already changing other parameter such as UDP or ICMP Ping to no avail, but the simple solution is pertaining to file permissions on spine.

Change the spine permission as follows

#cd /usr/local/spine/bin
#chmod a+s spine

You may run poller.php manually from your cacti root folder if you can't wait your cron cycle to run poller.php. You may see your device status as "Recovering" after running the poller.php.

Friday, February 17, 2012

Auto Login in Cacti

After finishing a second Cacti project, I need to place a link for the second cacti from the main Cacti System. It was just easy to make it using the 'superlinks' plugin in cacti, but the problem is, I have to do another login using my credentials for the second cacti system. And not only that, the header of the second cacti also appears below the header of the main Cacti.

I want my other users to view the "read-only" Devices (plugin), with only the device name and device status (up  or down. I modified the "Devices" plugin to suit my requirements and remove the headers from the script leaving only hosts status and filter options.

First, is to create an autologin.php in your cacti folder using the code below:

<?php

$_REQUEST["action"]="login";
$_POST["login_username"]='username';
$_POST["login_password"]='password';
$_SERVER["HTTP_REFERER"]='/plugins/devices/devices.php';

include "index.php";

?>

Call the script from your browser, and it will direct you to your http://your-server-ip/cacti/plugins/devices.php. The problem here is when you click again the 'superlinks tab', you will get an 'Access Denied'. To fix this, insert a code on your devices.php to call the autologin.php when opening the devices.php.

include_once("./autologin.php");

Then load the "http://your-server-ip/cacti/plugins/devices/devices.php" on the main Cacti's 'superlinks', you can now re-click the superlinks without getting an "Access Denied" error.


Thursday, February 16, 2012

Auto Refresh in PHP Script

Using the simple code below, you can auto refresh the output of your php script in a browser. Place the code on the first line of your php script.

<?php header('Refresh: 10'); ?>

**where 10 is the value in seconds, in the code above, your php page will refresh every 10sec regardless if there are changes in the data or none.


Tuesday, February 14, 2012

Scheduling Poller using Cron

Poller scheduling is not quite common to most of Cacti users. But when I setup a new Cacti system utilizing Ping for availability, there is a need to schedule a poller.php to run at a specified time only or when it's needed. ICMP is a heavy and resource-intensive type of monitoring, it can cause a high CPU utilization to the core routers creating high latency problems within the network. So it is very important to manage the resources wisely. Since my company is operating only on office hours, I scheduled poller.php to run only within the time frame only.

Here's is my cron settings for that particular requirements.

*/10 7-18 * * 1-5 root php /var/www/cacti/poller.php > /dev/null 2>&1

The cron settings above means that poller.php will run every 10mins, from 7:00am to 6:50pm, and from Monday to Friday only. This will coincide with the business operating hours only, and saving precious CPU power for other task such as system backup every night and every weekend.

Output graph of eth0 as a result of cron settings above


Related Posts:
- Cacti 1 minute cron settings
- 1 minute Spine polling

Saturday, January 28, 2012

Motorcycle Pricelist

Motorcycle transportation is booming in the Philippines, with all the daily traffic experience all over Metro Manila, many opted to utilize motorcycle as their alternate mode of transportation. Despite of danger, many still wants to have a motorcycle, simply because of its versatility, low gas consumption, and can inch their way in every traffic jams in the metro. In addition, more and more people can now afford to own a motorcycle especially those below average earners. In-house financing are readily available from most motorcycle dealers.


Thursday, December 29, 2011

Cacti > Data Sources > RRAs

Defining the right RRA Settings is essential if you are customizing how your graph will be displayed. RRAs were set by Steps, Rows and Timespan. These will determine how you keep your data in different intervals and how long would you keep that interval. Manipulating these intervals would require some storage space, the longer you keep the data at a very small interval, the larger space it will require on your storage drive. So proper RRA settings would help you maximize your storage capacity without sacrificing longer period of significant data.


Hourly (1 Minute Average)

Steps - are the number of data points needed to place the data in RRA, (keep in mind that my system is polling every minute)so my value is "1". This means that every minute, the data will be reflected on my graph, but for how long? the answer will be the number of Rows. My value for rows is 10080, this is equivalent to 7 days of 1-minute data.

To get this,

{[10080/(60/1 step)]/24 hours} = 7 days
{[10080/60]/24} = 7 days

Then, what would be my Timespan to display this graph? Timespan value is in seconds, I want to see my 1 minute graph in the last 6 hours, so my value would be 21600 sec = 6 hours


Daily (5 Minute Average)

Steps = 5, This means that the data will be reflected every 5 steps, (which is also equivalent to 5 minutes)

Rows = 8640, using the formula above

{[8640/(60/5 steps)]/24 hours} = 30 days
{[8640/12]/24} = 30 days

Timespan = 86400 sec = 24 hours


Weekly (30 Minute Average)

Steps = 30, This means that the data will be reflected every 30 steps or 30 minutes
Rows = 4320, using the formula

{[4320/(60/30 steps)]/24 hours} = 90 days
{[4320/2]/24} = 90 days

Timespan = 604800 sec = 7 days


Monthly (2-Hour Average)

Steps = 120, This means that the data will be reflected every 120 steps or 120 minutes or 2 hours
Rows = 2160, using the formula

{[2160/(60/120 steps)]/24 hours} = 180 days
{[2160/0.5]/24} = 180 days

Timespan = 2678400 sec = 31 days


Yearly (1 Day Average)

Steps = 1440, This means that the data will be reflected every 1440 steps or 1440 minutes or 24 hours
Rows = 720, using the formula

{[720/(60/1440 steps)]/24 hours} = 720 days
{[720/0.041666666667]/24} = 720 days

Timespan = 31536000 sec = 365 days


In summary, these are the data reflected on my graph.

last 7 days of 1-minute graph
last 30 days of 5-minute graph
last 90 days of 30-minute graph
last 6 months of 2-hour graph
last 2 years of 1-day graph

So every time I zoom in to my graph, I always have those date in every interval.

Friday, December 23, 2011

Cacti > Installing Plugin Architecture

The Plugin Architecture (PIA) is a set of code changes to core cacti. It is provided by Jimmy Conner (cigamit), one of the Cacti core developers. The Plugin Architecture for Cacti was designed to be both simple in nature and robust enough to allow freedom to do almost anything in Cacti. Cacti itself is designed nicely enough that integrating into it is fairly easy with very little modifications necessary (from here).

In simple terms for us users, it is simply a requirement in order to make the Cacti Plugins work.

Keep in mind that this procedure works on the following versions and on the environment I'm working with, see: My System

***Important Version Compatibility***

cacti_0.8.7g
cacti-plugin-0.8.7g-PA-v2.8

Before doing anything, backup your cacti-root-folder just in case you screwed up while making changes on your system.

1. Download cacti-plugin-arch and extract

#cd /opt
#wget http://mirror.cactiusers.org/downloads/plugins/cacti-plugin-0.8.7g-PA-v2.8.tar.gz
#tar -xzvf cacti-plugin-0.8.7g-PA-v2.8.tar.gz

2. Copy patch file to /var/www and perform patch

#cd cacti-plugin-arch
#cp cacti-plugin-0.8.7g-PA-v2.8.diff /var/www
#cd /var/www/cacti
#patch -p1 -N < /var/www/cacti-plugin-0.8.7g-PA-v2.8.diff

3. Edit include/config.php, and change database credentials

#vi /var/www/cacti/include/config.php

Update "url_path"

$url_path = "/cacti/";

4. Configure Plugin Architecture

- login to Cacti
- User Management > Admin > Realm Permission
- "check" the Plugin Management
- Done

5. Copy pa.sql on cacti webroot directory and execute import command

#cp pa.sql /var/www/cacti
#mysql -u cacti -p cacti < pa.sql


Plugin Management should now be found on the left panel of your Cacti page

In some cases, you may encounter errors such as this:

ERROR 1045 (28000): Access denied for user 'cacti'@'localhost' (using password: YES)

Execute the following commands to get rid of this error.

#cd /var/www/cacti
#mysql cacti < pa.sql
#mysql --user=root mysql

mysql> GRANT ALL ON cacti.* TO cacti@localhost IDENTIFIED BY 'cacti';
mysql> flush privileges;
mysql> exit

#mysql -u cacti -p cacti < pa.sql
NOTE: on mysql command line, replace the "cacti" with your "cactiuser" if you are using different user for your system

After doing this, you are now ready to install some of the important plugins such as "realtime", "monitor", "threshold", "spikekill", etc.

Saturday, December 17, 2011

Myth of the Human Body - Philippines


Together with my cousin, we went to this one-of-a-kind exhibit called Myth of the Human Body in Taguig City, Philippines. The exhibit is located at Neobabylon Bldg, 9 Bayani Road, Taguig City. The exhibit is about the method of preserving the human body by the process of plastination. The display showcases the works of Dr. Gunther von Hagens who invented this method for about 2 decades ago. Be warned that exhibit are all real specimens of the dead, which may be disturbing to some others especially children at young age.


It was Dec 5, Monday, when we visit the exhibit. The afternoon was misty, and no other visitors lining at the ticket booth. We got our tickets for P350 each. At the ticket booth, it was clear that we are not allowed to take pictures of the exhibit, mainly because of the controversies surrounding this particular work of Dr. Hagens.

Upon entering the exhibit room, we were approached by the attendant if we want to have a guided tour, or we can roam freely around as long as we want. My cousin and I decided for the second option so we can have more time at every specimen.. after all, there are explanation posted on the backdraft of every specimen that we can read on.

There was an eerie feeling when we started our tour. We were the only visitor that day, the museum was very quiet which adds to a more creepy feeling being the only two of us and all the dead bodies. As we go along stairs-by-stairs, there was an element of surprise and excitement as we don't know what to expect on the next hall of the exhibit. There were a lot of human body parts, every organ, every muscles, every components of the human body is there, sliced, cutted-through, stripped by skin, and dissected. You will just wonder how many dead bodies were processed to have that huge collections. What disturbed me most was the development of an embryo, from it's 1st week up to its 10th month, the samples are estimated to about 30 specimens all in human's early stage of development. The display were all both disturbing and fascinating, one that fascinates me most was the "Red Man", it was a full bodied structure of a human nerves, looking through it makes you realize that we are wired by tiny-delicate nerves all throughout our entire body. I was a bit skeptical about it because I can't figure out how they could extract those from a real body without destroying those tiny-delicate nerves. That is the only display I think is not real, but that's for me, remember we don't have guides to ask about it.

Generally the whole exhibit was an extraordinary presentation of the "Human Body", knowing what it is, and how it works. This is a very rare occasion wherein you can't afford to let it pass. When this exhibit ends on April 2012, it may not come back here again in a long time and you have to go to other countries where this exhibit will be shown next. Though this exhibit may give you a temporary loss of appetite, creepy feeling, and nightmares to some, but it's all worth it. The knowledge you get from this exhibit would definitely make you think before you do harm on your body.

As the end of the exhibit reads:

Those bodies were (not-all) donated by ex-con in China. Some of those may be voluntarily donated willingly, all in the name of "Science"

Wednesday, December 14, 2011

Cacti > 1 minute polling - Drawback

Generally, using Cacti's 1 minute polling can be a great improvement in monitoring your network. Imagine that you can monitor hundreds of host and get their status every minute without exploiting the use of realtime plugin. You can also determine what particular minute did your host change its status from up-to-down and vice-versa. This is also very beneficial in responding for faults quickly, if the host is down in the first minute, you don't need to wait for another 4 minutes just to know that your host is already down. This 4 minutes can be long enough to resolve a minor connection problem. Moreover, 1 minute polling can detect intermittent connection better the 5-minute polling, more often, 5-minute polling can't be an accurate basis for troubleshooting an intermittent connection.


Unfortunately, one critical instance in monitoring every minute is that when most (hundreds or so...) of your host were down, cacti's poller will took longer to poll downed host, and polling won't be completed in just 1 minute, this will cause gaps on some of your graphs where it is not supposed to. The poller will again starts the polling cycle at the end of every 60 seconds without completely polling other host especially those with higher device IDs.


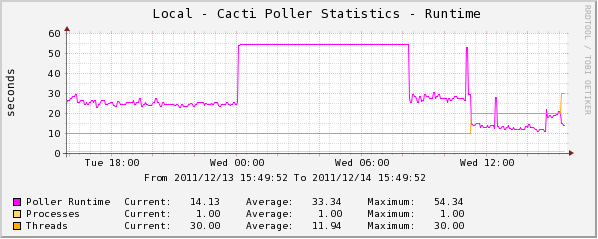
My current fix is to increase the Spine's maximum threads per process by 50% from my current settings, I hope this will be enough to completely poll all host when a major downtime happens again. Cacti's poller stats runtime is down to only less than 15sec from its previous 25sec.

Saturday, December 10, 2011

Cacti > Installing Spine

Spine is the fast replacement for cmd.php. It is written in C to ensure ultimate performance for device polling. Expect a decrease in polling time of an order of magnitude. Polling times far less than 60 seconds for about 20,000 data sources are achievable e.g. on a dual XEON system supplied with 4 GB RAM and standard local disks.

When using Spine, don't change crontab settings! Always use poller.php with crontab! To activate Spine instead of cmd.php, please visit Settings and select the Poller tab. Select Spine and save. Now, poller.php will use Spine on all subsequent polling cycles.

While Spine is really fast, choosing the correct setup will ensure, that all processor resources are used. Required settings for Maximum Concurrent Poller Processes are 1-2 times the number of CPU cores available for Spine.

Download Spine from the following links:

http://www.cacti.net/downloads/spine/cacti-spine-0.8.7g.tar.gz - Working but realtime is not displaying images
http://www.cacti.net/downloads/spine/cacti-spine-0.8.7.tar.gz - This is the version I used on my system

Version Compatibility:

cacti-0.8.7g
cacti-spine-0.8.7
realtime-v0.43-1

1. Download and install first the dependencies:

#yum install net-snmp-devel mysql mysql-devel openssl-devel ksh automake autoconf libtool gcc make -y

#cd /opt
#wget http://www.cacti.net/downloads/spine/cacti-spine-0.8.7.tar.gz
#tar -xvzf cacti-spine-0.8.7.tar.gz
#cd cacti-spine-0.8.7
#chmod 744 ./configure
#autoconf
#autoheader
#automake
#./configure
#make
#make install
#cp /usr/local/spine/etc/spine.conf /etc/spine.conf

2. Edit "/etc/spine.conf" to match cacti's config.php

*DB_Host should be the same with include/config.php

DB_Host               localhost
DB_Database        cacti
DB_User               cactiuser
DB_Pass               cactiuser
DB_Port               3306
DB_PreG              0

3. Login to Cacti's Web interface - Within the cacti GUI add the spine binary path

Settings > Paths '/usr/local/spine/bin/spine'

and then under the Poller tab change the type from cmd.php to Spine.


You can verify you logs by:

#tail -f /var/www/cacti/log/cacti.log

Referrence:  Cacti.net - Spine Documentation

Configuring VM Display and Mouse

Since I started working at a new company, virtual PC became one of the helpful things for me, and with a newly issued high-performance workstation, I could run multiple virtual machine with ease. By now, I already have 4 virtual machine configured, all in CentOS environment. I used this VM as a test environment before I implement optimization on my production system.

Usually, I run linux in CLI, but one of the application i'm going to install requires Linux GUI. I successfully installed CentOS 5 in graphical mode, but graphics were garbage and I couldn't get my mouse to work on VM.

@ default depth of 24

Here's how I made it to work.

This will enable you to use X11 graphical mode on virtual machine.

      - boot your VM in graphical mode
      - upon seeing the log on screen hit  Ctrl + Alt + F1 to get in the shell

(other method is to do via ssh, just start your VM and let it boot until "Username" logon appears, despite of garbage graphic, you may still see the logon screen of Centos 5. Once it appears, connect to your VM via ssh, provided you configured the IP Address during the installation process)

#vi /etc/X11/xorg.conf

      - look for Section "Screen" and change the default depth from 24 to 16, you can also add Modes "800x600" if you want to customize your screen resolution.

Section "Screen"
              Identifier             "Screen0"
              Device                "Videocard0
              DefaultDepth      16
              SubSection "Display"
                            Viewport         0 0
                            Depth              16
                            Modes             "800x600"
              EndSubSection
EndSection

      - exit from vi saving the changes
      - restart VM

After changing Display Depth to 16

At this point, you can now view your VM in graphical mode but your mouse still won't work.... don't worry, we are not finish yet.

To fix the mouse pointer, edit your grub.conf

#vi /boot/grub/menu.lst

Add the following line on the kernel option

kernel /vmlinuz-2.6.18-194.el5 ro root=/dev/VolGroup00/LogVol00 rhgb quiet i8042.noloop psmouse.proto=imps clock=pit
initrd /initrd-2.6.18-194.el5.img
IMPORTANT NOTE:  "i8042.noloop ......."  should be in the same line with "kernel" or else it won't work.

Here's why:

      i8042.noloop -------------- fixes mouse issue
      psmouse.proto=imps -------- gets the mouse wheel working (though I placed this, my mouse wheel still doesn't work, but it's ok for me as I'm not working most of the time in graphical mode)
      clock=pit ----------------- fixes clock issue


Saturday, December 3, 2011

Food Delivery Numbers - Philippines

A collection of food delivery numbers in Metro Manila, Philippines.

Fast Foods:

KFC - 887-8888 (Hotline)
McDonalds - 8-6236 (Hotline)
Jollibee - 8-7000 (Hotline)
Kenny Rogers - 533-8888 (Hotline)

Chicken Haus:

Mang Inasal - 631-6679 (Santolan, Pasig Branch)
Mang Inasal - 477-8371 (Brookeside, Cainta Branch)


ChicBoy - 832-9056 (Boomland, Gil Puyat Ave, Pasay Branch)


Pizza Haus':

Pizzahut - 911-1111 (Hotline)


Shakeys - 77-777 (Hotline)
Dominos - 895-8888 (Makati Branch)

Restaurants:

Max's - 7-9000 (Hotline)
Amber Golden Plate Restaurant - 884-8888 (Filmore-Makati)
Amber Golden Pot Restaurant - 533-1111 (EDSA-Mandaluyong)
Buddy's Restaurant - 899-1170 (2948 Kakarong St. Makati City)
Cifu - Asian Cooking - 524-3104, 523-1854 (Pedro Gil, Malate)


SuperBowl of China - 747-2845, (SM MOA)


Bar:

V8 Baresto - 584-3460 (Pasig Blvd, Main Branch)

Tuesday, November 29, 2011

MSI-ECS - The Great HP Sale - chaotic!

Monday, November 28, 2011.. I went to this Warehouse Sale at 9:00am. When I arrived in MSI-ECS, a crowd of people already waiting outside the door. They issue a number for an orderly manner of getting inside the sale area. I got number 225, which means the 224 people arrived before me despite I arrived at opening time. There were already 125 people inside and guards only allow 15 to enter at one time and whenever 15 came out. And since I have to wait 100 customers before my number will be called, I took my breakfast from a fast-food not far from the venue. I came back at 10:30am, it was still at 180, so I keep on waiting together with others crowding the hallway and sitting on floors.


It was already 12:30pm when I was allowed to enter. Inside, we were again waiting for our number to be called and the last number served was 220. The inside was already chaotic, a lot of people is squeezing in and out a small conference room where sale items were displayed. 15 minutes of waiting, but it seems that nobody was already manning the passage to the display room due to chaos, so I slipped fast into the room, others follow and no one personnel was stopping us.

Lot of items I wanted were already gone, so I just got other items which were a lot cheaper compared to their SRP. The process in purchasing was the Sales Personnel will create an order slip for your orders and forward your items to the 'Claim' area. This is where the problem starts. After paying at the cashier, you were supposed to get all of your items at the claiming area, the problem was, some of the items were not all accounted, and not yet there. Maybe due to chaos inside, some items were not properly labeled to matched with the order slip, the outcome was affected customers were getting angry of waiting for their already purchased items.

Fortunately for me, I had only less that 10 items consist of computer accessories, but, unfortunately, nobody is attending me at the Releasing area, they are all busy attending every irate customers. I then resulted to a security guard in-charge to check my items and have it stamped "RELEASED" so I can bail out in that chaotic room.

Outside, there were still a lot of people waiting at the hallway and the number issued was already at 500+..  I wonder when those people can get inside since it was already 2:30PM when I got out.

The event will last until Friday, Dec 2, 2011, I hope the system will change as to avoid same chaos.

Saturday, November 26, 2011

Cacti > 1 Minute Polling Using Spine

Just this morning, after about a week working on how to make my Cacti system poll every minute, I finally pulled it off. The procedure was simple but a bit long, I did only adjustment the cron jobs and series of configuration on Cacti's web interface.

Here are my general procedure on how I make it work

1. Edit cron to run /var/www/cacti/poller.ph every minute

#crontab -e

*/1 * * * * php /var/www/cacti/poller.php > /dev/null 2>&1

2. On your Cacti web interface - Console > Data Templates


3. Change the template "step" to 60 (this is in seconds = this is already the 1 minute polling interval)
4 Change "heartbeat" to 120 for both traffic_in and traffic_out and save


5. Go to Console > Cacti Settings > Poller tab
6. Change the Poller Interval and Cron Interval to "Every Minute" and save


7. On Console > Utilities , click on Rebuild Poller Cache
8. You can also run php poller.php on your cacti folder

#php poller.php 

9. Verify if your cron is working by checking the cacti.log


10. On Console > Data Sources > RRAs, define the number of rows you want to maintain a 1 minute data
11. Create a new graph using the "Interface Traffic" template, so will see that your graph will display a 1 minute worth of data gathered.


Note: For those existing graph with 5-min polling interval, you need to re-create the graph or just simply delete the associated rrd files, thus losing your historical data.

Cheers!!!.. for now I will go out and celebrate my self!.. :)


Related Posts:
 - Setting-up your RRAs
 - Installing Spine
 - 1 minute polling drawback

Cacti > My System


In aid of uniform information about cacti posted in this blog, here is the Linux-Cacti environment that I'm working with. Given that Linux have different environment, I can't guarantee that information from this blog will work on other linux environment other than below.


Linux OS ----------------- CentOS 5.7
Cacti Version ------------ 0.8.7g
Spine -------------------- 0.8.7
Plugin Architecture ------ 2.8
SNMP Version ------------- 5.3.2.2
RRDTool Version ---------- 1.4.x
MySQL Version ------------ 5.0.77
PHP Version -------------- 5.1.6
No. of Host -------------- 600
Graphs ------------------- 1195
Apache ------------------- 2.2.3 (CentOS)


I recommend you to backup your system before implementing any changes to it, If you have almost same environment as mine, feel free to ask, perhaps I can help.

Thursday, November 24, 2011

Cacti > Cron

Been working with my cacti system for the past 5 days trying the cron to make it poll every 1 minute. My first step was changing the cacti settings at Console > Settings > Poller, setting the poller interval "Every Minute" and Cron Interval to "Every Minute".. but this doesn't work on Cacti 0.8.7g with Spine 0.8.7.

I've searched from cacti.net forum and other blogs to no avail. With all those research done on how to work with cron jobs, I managed to make my cacti system poll every minute through cron. So here is what I have done.

#crontab -e

Add this line on your crontab, this will schedule your poller.php to run every minute.

*/1 * * * * php /var/www/cacti/poller.php > /dev/null 2>&1

For any reason that when you typed 'crontab -e' and get an error like 'no crontab for root, just create a 'cron' folder on /var/spool and then repeat the 'crontab -e' procedure above. Upon exit, the crontab details will then saved on /var/spool/cron/root


My cacti is now polling every minute but the polling intervals on my graphs are still at 5 minutes. For now, I haven't found a solution yet on how to make the 1 minute data to reflect on my graphs.


Saturday, November 19, 2011

Cacti Plugins > Devices

It's been more than 36 hrs after my first post in this blog. For the past two months now, I'm working with Cacti Network Monitoring System as my new job in a company. The system is in dry-run phase now and still working with useful plugins for added functionality.

Apart from the other plugins such as spikekill, threshold, monitor, ip subnet, realtime, etc which are already in placed in my system, I came across with the Devices plugin. This plugin will use the existing cacti database under Console > Devices. The plugin is a read-only access to the devices and when clicked, it went to Graphs > Preview Mode rather than "Edit host" when clicked from Console > Devices. This will also beneficial if you want selected users to view the list of devices without manipulating the configuration.

The only lacking feature I've noticed is I can't click the 'status' header of the list to sort as what I usually did on Console > Devices, though it has a drop-down filter to display the specific status.

Install this plugin like any other cacti plugins (I will post a step-by-step guide for new users like me... soon)

Info and downloads from cacti.net can be found here


Thursday, November 17, 2011

A Welcome Post

Why I created this blog? ... because I had to.

With all those information day-by-day it was so hard to keep track all of them. So I would start writing them. This blog would contain any information, thoughts, and views of the author and this would not be a uni-topic blog site, instead, this will stick in one definition of blogging... an online diary...

So what to expect on this blog? ... anything... experiences,... arts, ... technical matters, ... including foolishness and stupidity... what more?... i don't know yet.. will see what will happen..

If you want to follow this blog, it's up to you... but i'm certain that someday you will bookmark one of my pages...

So... I'm welcoming you to my online world now..